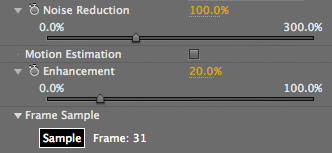
Main Controls
When Denoiser is applied, you don't have to do any setup or press any buttons. The software immediately looks at your footage and runs a denoising pass. Typically the plug-in will immediately produce good results, but in some situations, you will want to make adjustments. The main controls are described below.
Denoiser works by combining information over several frames to separate the noise from the source image. Noise is a random phenomenon, while clean image pixels do not change much between frames. Let's get started!
Noise Reduction
This is the main control for how much noise you do (or don't!) want to see in the footage. The automated noise measurement process recommends the amount of noise to remove; that amount is defined as 100% noise reduction.
Default value is 100%. Value range is 0-300%. Increasing Noise Reduction removes more noise and will usually create a smoother output. Decreasing the value leaves more noise in the image. You may want to remove more noise or less noise depending on the visual look you are going for.
For the best results, you want to find a pleasing middle point that keeps image detail but smooths away noise. It is a good idea to look at large areas of unchanging color -- like someone's solid sweater or an expanse of skin -- to see what is happening and make sure those areas aren't getting too smooth.
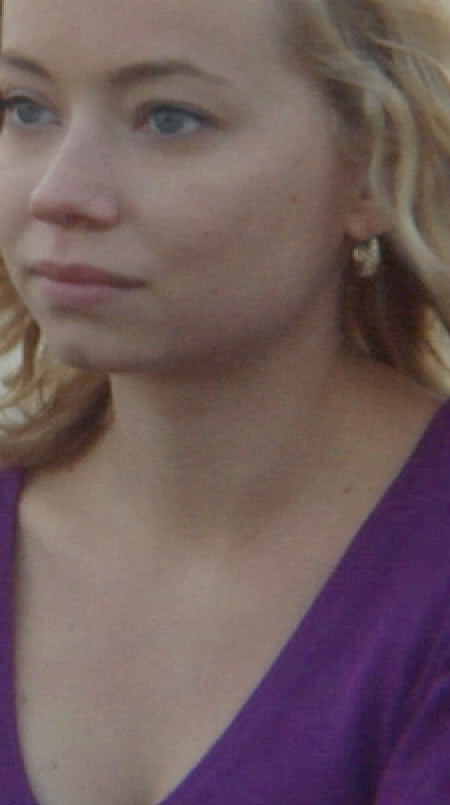

Left to right, our footage frame before and after Denoiser II.
Motion Estimation checkbox
In interesting image sequences, people and objects tend to move around. To deal with this motion, Denoiser has a Motion Estimation option to keep track of where the pixels have moved between frames.
Motion Estimation tells Denoiser to compare where pixels have moved between frames to decide what is actual noise and what is natural motion in the scene. This checkbox defines whether or not to use motion compensation in its noise reduction, which will help to preserve fine detail even in high-motion shots.
Since Motion Estimation is a computationally demanding process, we have two options that allow you get the best quality vs. speed tradeoff.
• Off: The default value. This is the fastest setting. Uses no Motion Estimation and is suitable for clips where the motion is minor.
• On: When Motion Estimation is on, the plug-in will perform motion-detected noise reduction. If your clip contains a lot of motion, turn on Motion Estimation to preserve moving details at the highest quality. Use for high motion scenes to get the best quality and sharpest results as it will track any object whether it moves slowly or not. Render time is about half the speed as when Motion Estimation is off. If you have a lot of motion in your shot, Denoiser will take longer to estimate the motion of the objects.
Denoiser 1 Note: The On option was previously the High option in Denoiser 1.
Works with Noise Hint: Motion Estimation works closely with the Noise Hint [ME] option in the Advanced Settings. Change the Noise Hint from Medium to High to decrease your render time because Denoiser II is estimating a more general sampling from the frame. Setting the Noise Hint to Low will increase render time because Denoiser II is taking more information into account.
NOTE: If your render time is unusually high with Denoiser applied, set Motion Estimation to None, and run a pure noise reduction pass on a handful of frames to see if you get a different render time.
Enhancement
As part of the denoising process, it is possible to enhance fine edges and other fine details in the image. Enhancement will turn up the sharpener that is built into Denoiser, in order to sharpen the fine details better.
Default value is 20%. Value range is 0 to 100%. Higher values increase the sharpening and boost the details higher.
The Enhancement option should be used with some care. A comfortable range is typically around 20-30%. Be careful about setting Enhancement too high. You do not need to set it to 100% and generally not even to 50%. You only need to push Enhancement to 100% if you have really soft source footage and really want that extra detail boost. If you enhance details too much, you may see a halo or ringing artifact near the edges of the subject, where there are high contrast lines. If you see this artifacting, reduce the Enhancement level.
Workflow Note: If you enhance an interlaced frame, then all the jaggies get enhanced too. With 100% enhancement, you end up boosting the jaggies so much that the interlacing becomes very prominent. See our notes about Prepping interlaced footage.
Frame Sample button
Denoiser tries to identify what is noise in your footage, then fixes that noise. The first time you apply Denoiser to a clip, the plug-in estimates the noise information using the frame currently selected in the Timeline.
If you want to sample a different frame instead, scrub to that frame and click the Sample Frame button. This button is a helpful feature if you want to use a frame elsewhere in your footage that shows lower texture and lower motion overall. Read our notes about Choosing a Frame.
Default value is the current frame in the Timeline. The frame number that displays is the frame being sampled for noise detection.
Workflow Note: When you click the Sample Frame button, the Show Noise Detection checkbox ungrays in the Advanced Settings section.
Denoiser 1 Note: The first frame in the Timeline is displayed as Frame 0. In Denoiser 1, the first frame is displayed as Frame 1. We changed the display to Frame 0 to match how After Effects reads where the frame begins.
