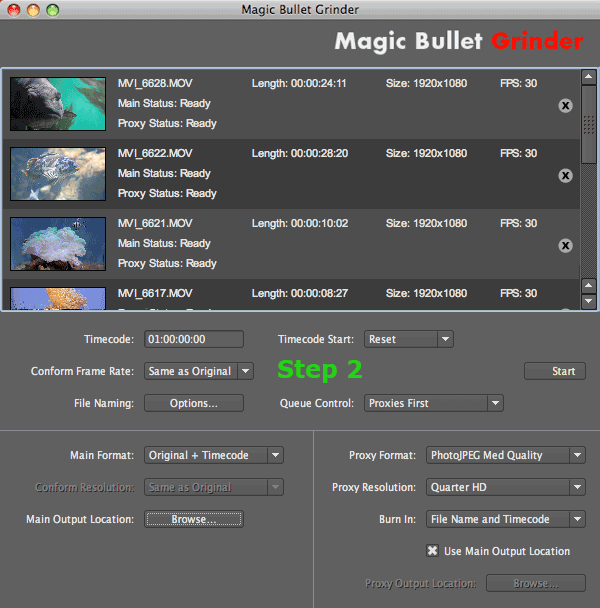
Step 2: Set batch options
In the Batch Options area, select batch process options for timecode, frame rate, render priority and naming conventions.
Once you have decided the batch options, go to Step 3: Set main file options.
Timecode field
Timecode Field specifies the starting time for the Timecode track written to each output file. Timecode is the track that matches a frame to given a point in time. Both main and proxy formats always get a timecode track. However only the proxy file has a visible timecode burn-in, which is why the proxy side of Batch Options has a Burn In feature.
By default, Grinder starts its timecode at 1:00:00:00, which is 1 hour, and counts all frames forward from this point in time. This start time is set with the Continuous option in Timecode Start (see below). You can set the start time to a different value by typing in the Timecode Field.
NOTE: You can view the timecode track if you open a Grinder-processed file in QuickTime 7 Pro and use the Movie Properties command to reveal the track. You will see the duration and start time of the timecode.
Timecode Start pop-up
The three Timecode options determine what timecode the clips start at. Once you select an option, it remains selected until you choose a different option.
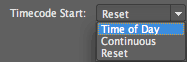
• Time of Day Cameras store EXIF data that saves the time that you shot the video. This option lets you use this EXIF data as your timecode. The EXIF data from each associated .thm file will generate unique timecode for each output file.Each clip will have a start time based on the EXIF data available in the matching .THM file saved in the source media. If this option is checked but the .EXIF source data is not available, then the clips will use Continuous Timecode instead.
IMPORTANT: When choosing Time of Day, you need to have a .thm file associated with each QuickTime movie. Otherwise this option will not work and Timecode Start will default to Continuous.
• Continuous: The defailt setting. Each clip's timecode is set based on the running length of the previous clip. For example, if the timecode starts at 01;00;00;00, then the first clip starts at that time, and the next clip will start wth the last clip's end timecode plus one frame.
• Reset: The default option. Resets timecode for each clip starting at the specified timecode. For example, if the timecode starts at 01;00;00;00, then all clips will begin at this time.
Conform Frame Rate pop-up
Lets you conform the loaded media to ONE frame rate. This means that no matter what the input is, the output frame rate is set to the chosen frame rate.
AUDIO NOTE: Conform Frame Rate is meant to allow media to be conformed for slow motion playback/edit. The audio will not be conformed and will therefore sound slow, but it will be in sync.
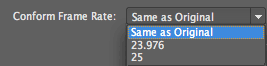
• Same as Original. Maintains the original frame rate of all files; essentially bypasses this option.
• 23.976. Conforms all media to 23.976 fps.
• 25. Conforms all media to 25 fps.
File Naming button
The Naming options let you customize the naming convention used for files output by Grinder. By default, Grinder simply appends (or adds) 'main' and 'proxy' to the end of the original file name just as in the original. This makes it easy and fast for you to get started without setting too many options. For advanced users, having complete control over your naming conventions is very helpful. Once you select an option, it remains selected until you choose a different option.
There are three Naming options for main or proxy file names:
• Filename pop-up: Predefined combinations of file name, timecode stamp and custom text, date rendered, and sequential numbering.
• Custom Text: Appends a prefix to the name.
• Start Number: Appends a sequential number to the name.

Queue Control pop-up
Manages the render priority given to main vs proxy files. You can choose to export all proxies and then all main files, or vice versa.
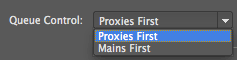
• Proxies First. The default setting. Renders all the low-resolution proxy files before the full-resolution main files are rendered. The first main begins only after the last proxy finishes. This lets you edit with the Proxies immediately while the full-rez files are still rendering. The files are rendered in this order: Proxy1, Proxy2, Main1, Main2.
• Mains First. Renders all the main files before the proxy files are rendered. The files are rendered in this order: Main1, Main2, Proxy1, Proxy2.