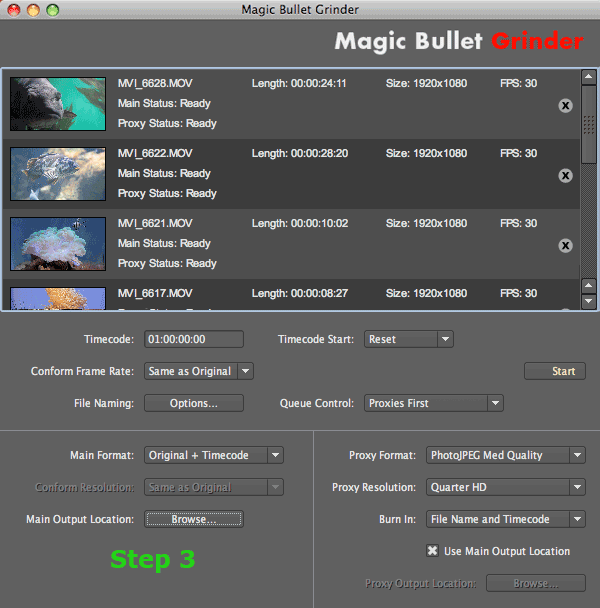
Step 3: Set main file options
In the Main Options area, choose the transcode format, file resolution and render location of the main file output.
Once you have decided the main options, go to Step 4: Set proxy file options.
Main Format pop-up
Sets the codec of your processed main files. Grinder is capable of processing to different codecs at fixed quality settings. All of the formats will maintain the full resolution of the original. Audio is passed through as an uncompressed PCM stream, same as the original file.
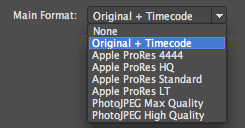
• None. Turns off the Main Format transcode. Use this option when you only want to export proxy files.
• Original + Timecode. The default setting. This option simply copies the file to its destination and adds a Timecode track. It does not change the codec used.
• Apple ProRes 4444. Only available if Final Cut Pro 7 or higher is installed.
• Apple ProRes HQ. Only available if Final Cut Pro 7 or higher is installed.
• Apple ProRes Standard. Only available if Final Cut Pro 7 or higher is installed.
• Apple ProRes LT. Only available if Final Cut Pro 7 or higher is installed.
• PhotoJPEG Max Quality. 100% Quality setting. Allows 4:4:4 encoding.
• PhotoJPEG High Quality. 75% Quality setting.
Conform Resolution pop-up
Keeps the resolution of your clip or converts the resolution to 1080p. This is useful if you are using 720p footage and want to either keep that original size or want to convert it to 1080p. Once you choose an Apple ProRes or PhotoJPEG format, this pop-up becomes available.

• Same as Original. The default setting. Takes on the resolution of your original clip. If the original is 720p, the output is 720p. If the original is 1080p, the output is 1080p.
• 1080p. Sets the resolution to 1080p. If the original is 720p and you tell Grinder to use 1080p, the output will be 1080p.
Main Output Location button
Chooses where your main files are saved to. Proxy files are saved using the Proxy Output Location button.