LooksBuilder: Graphs Panel
The Graphs panel is activated by clicking the Graphs button at top right of the Info Bar. This panel is turned off by default. When it is turned on, multiple Graph tabs are added.
If LooksBuilder is running in Default Mode, then two Graph tabs appear: RGB Parade and Slice Graph. If LooksBuilder is running in Advanced Mode, then a third tab called Graphs is added.
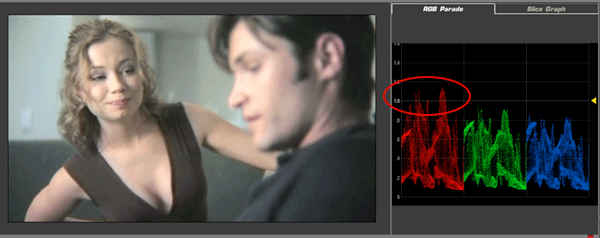
RGB Parade tab
The RGB Parade tab displays a graph showing the amount of Red, Green, and Blue in an image. The display is an incredible wealth of information that is rarely seen in other interfaces. In the RGB Parade, the brightness of an average of a number of columns is shown as values from top to bottom in the graph. The graph shows a range of greater than 0-1.0 in floating point units. The range scales from 0.0 to 100.0, showing up to 100 stops of brightness. You can click and drag the yellow triangle (at right) to adjust the vertical scale of the graph to display overbright information.
Note how the overbright information in the red channel (circled in red) is shown above the 1.0 line. These values can be processed in a non-linear format like Cineon for film output, but will cause solid white areas in digital formats. The Auto Shoulder tool in the Post tools section can be used to keep all colors in the 0-1.0 range.
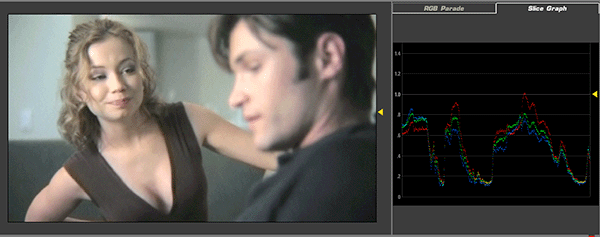
Slice Graph tab
The Slice Graph tab displays Red, Green, and Blue values of a single row of pixels as designated by the yellow arrow in the Preview area. Click and drag the yellow triangle in the Preview area to change the row readout. Move the yellow triangle in the graph to adjust the vertical scale of the graph. This tool can be useful for identifying specific overbright ranges, or color values for flesh tones.
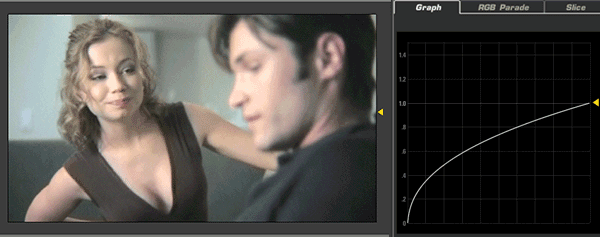
Graph tab
The Graph tab appears when LooksBuilder is running in Advanced Mode, and displaying the Output, Input or Preview panels. This function is set by the I/O Processing pop-up in the Preferences Panel. The Graph tab reflects changes that you make to your color settings.